")


Configuration steps
A configuration and start of the SoftPI Flow Collector service are performed in the Flow collector administration program. The configuration consists from the following steps:
- configuration of the data collection parameters (the Traffic collector configuration page);
- choice of storage type. If Microsoft SQL Server or MySQL will be used as a storage, you must download the appropriate installation of the SQL server and install it on your computer;
- configuration of the data storage parameters (the Storage configuration page);
- configuration of the aggregation parameters if it is necessary (the Aggregation configuration page);
- start of the service (the Service configuration page).
Settings of data collection parameters
Start the Flow collector administration program and click Traffic collector. You will get a screen as shown in Figure below.
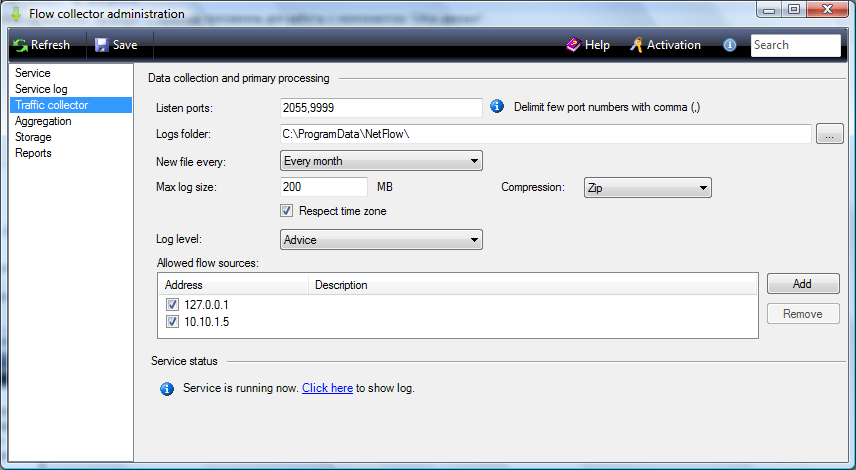
In the Listen ports box, enter a list of IP ports, which should be used in the Flow Collector service to collect data. It should be borne in mind that the service works using only UDP. In case using more than one IP port you must enter their numbers using comma. The default value is port 2055. This port is usually used for NetFlow. For IPFIX according to RFC 5101, port 4739 should be used to listen for an unsecure connection. However, not all manufacturers adhere to this requirement. So you should accurately determine the IP port number used for data transmission by NetFlow, IPFIX or RFlow protocols in the documentation for telecommunications equipment.
Flow collector except processing the incoming data flow and writing it in a storage executes the backup of the data flow into a log file in the form in which these data come from the network interface.
In the Logs folder box you can change the path to the folder where the files will be stored. The default folder is: \ProgramData\NetFlow\
In the New file every list, select a required period to create a new log file. Possible options are:
- Don't rotate;
- Every hour;
- Every day;
- Every month.
Regardless of the selected period in this list you can determine the size of the log file in the Max log size box. After reaching the set value a new log file will be created. The default size is 200 MB.
To reduce the volume occupied by the log file, you can perform a compression. Compression is automatically performed immediately when data is written to the file. You can use different data compression algorithms that is determined in the Compression list. The Compression list contains the following options:
- No compression;
- Zip;
- Bzip;
- Zlib.
The SoftPI Flow Collector service can log the results of their work with varying degrees of detail. The level of detail is determined by the value specified in the Log level list. There are options:
- Status,
- Critical error,
- Error,
- Warning,
- Information,
- Advice,
- Debug.
The Status level is the least detailed level. The Debug level is the most detailed level. In this case, for example, the IP addresses of devices from which data is received are displayed. The default value is the Information level.
In the Allowed flow source table, specify IP addresses of telecommunications devices, from which the Flow Collector service must collect data. To add a new IP address, click on the Add button. The Flow source window appears as shown in figure below.
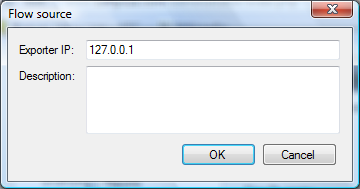
In the Exporter IP box, enter an IP address of the required device.
The Description box is for informational purposes.
Note. The SoftPI Flow Collector service can itself add IP addresses of telecommunications devices, from which data is received, to the Allowed flow source table. But if a specific device is not selected in the table, the data from that device will not be processed. Accordingly, for data processing with the required data sources, select the required IP address.
After entering all the above parameters, click on the Save button located on the toolbar.
Data storage configuration
As mentioned above, before a data storage configuration the user must decide what type of storage will be used. If you suppose to use Microsoft SQL Server or MySQL, you should download the appropriate installation and install it on your computer.
We recommend to use Microsoft SQL Server 2014/2012 as a storage. By using this server as a storage and choice of fields to store information about network flows similar to the fields of NetFlow version 5, the Reports page will be available from the Flow collector administration program. Otherwise, the user must himself find an application that will provide the required reports from a storage.
Select the Storage configuration page. You will get a screen as shown in Figure below.
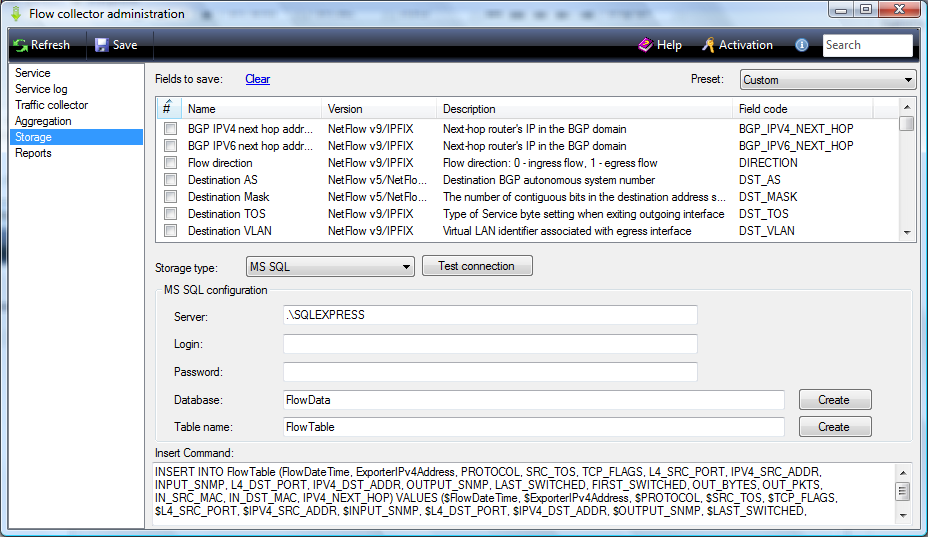
Define a list of fields that will be processed and stored in a data storage. You can use a predefined set of fields. Selecting pre-set fields is performed from the Preset list.
You can select one of the following options:
- NetFlow v5 default – provides a choice of the most commonly used fields of NetFlow version 5;
- NetFlow v9 default - provides a choice of the most commonly used fields of NetFlow version 9;
- IPFIX default - provides a choice of the most commonly used fields of IPFIX;
- All NetFlow v5 fields - provides a choice of all fields of NetFlow version 5;
- All NetFlow v9 fields - provides a choice of all fields of NetFlow version 9;
- All IPFIX - provides a choice of all fields of IPFIX.
- templates.
A network administrator does not always knows the whole list of fields that are in a network flow which equipment provides. In this regard, the better to choose the fields from the list, which network equipment provides.
SoftPI Flow Collector recieves a template from a network equipment and saves it. After this the template is available to the administrator on the Storage tab from the Preset list. In the list the templates have the following names: template.X.A1.A2.A3.A4.N.xml, where:
X - protocol version number. For example, for NetFlow v9, X is equal v9.
A1.A2.A3.A4 - IP address of device from which a template was received.
N - a template number.
There is network equipment that supports NetFlow, or IPFIX, or RFlow, and also has vendor-specific fields. Most flow collectors are not able to handle such fields. But the opportunity was in SoftPI Flow Collector 1.9.3.
A list of all the fields, which are processed in the system, is contained in the file: fieldsinfo.xml
The file is located in the folder where SoftPI Flow Collector is installed. By default, it is a folder: ...\Program Files (x86)\SoftPI\FlowCollector\
The user can add information about a new field in the file. Information about a field is contained between tags: <FieldInfo>, </FieldInfo>
A type of field is contained in the tags: <FlowFieldType>, </FlowFieldType>
A code name of field is contained in the tags: <Code>, </Code>
A full name of field is contained in the tags: <Name>, </Name>
A field description is contained in the tags: <Description>, </Description>
A data type of field is contained in the tags: <DataType>, </DataType>
To add a vendor-specific field, the user must open the specified file and enter the appropriate information.
If the user is interested in any particular set, which does not correspond to any of the above sets, the user can select the desired fields by checking the required rows of table in the "#" column.
If you plan to receive data from multiple network devices that use different protocols, respectively, select the fields that are supported in all types of required protocols.
The table of fields contains the following columns:
- # - the column shows the selected fields;
- Name — displays the name of the field;
- Version — displays a type and version of protocol;
- Description — displays a brief description of the field;
- Field code — displays a field name that is used in the database. The name is also used in the Insert command box for the automatic creation of a database query to store data.
The table supports sorting information. To do this, click on the name of the column of interest.
A few features are available if you right-click on the table headers. A menu appears as shown in figure below.
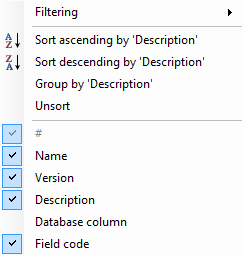
"Filtering" - Selecting this menu item leads to an additional menu, where the user must check the letters, which are the first in names of any of the fields. It allows to filter information.
"Sort ascending by 'XXXXX'". It allows to sort ascending by 'ХХХХ' field. The selected 'ХХХХ' field is determined by the name on any of the columns where the cursor was at the time to click for the menu.
"Sort descending by 'XXXXX'". It allows to sort descending by 'ХХХХ' field. The selected 'ХХХХ' field is determined by the name on any of the columns where the cursor was at the time to click for the menu.
"Group by 'XXXXX'". Allows you to group data in the table on the first letters of words in the selected column.
"Unsort". This item disable previously the set grouping mode in the table.
To quickly find the desired parameter in the table we recommend to use the search mode. Enter the required information in the box with the "Search" word on the right side of toolbar.
When you desire to use the Report page of the program you must:
- in the Storage type list, select the MS SQL option;
- select the fields for NetFlow version 5.
There are the following options in the Storage type list:
- MS SQL – Microsoft SQL Server 2014/2012/2008/2005/2000 can be used as a storage. If you have not purchased Microsoft SQL Server and is not going to purchase, we recommend you use a free edition: Microsoft SQL Server 2014/2012 Express.
- MySQL – MySQL Server is used as a storage.
- CSV file – A text file is used as a storage. The file must have the CSV format.
If you have chosen the MS SQL option, enter a server name or its IP address (if it is necessary, enter IP address with a server name) in the Server item.
In the Login and Password boxes, type a user name and password, with which SoftPI Flow Collector will connect to SQL server. If you use Microsoft SQL Server on the same computer, where SoftPI Flow Collector will work, by default, Windows authentication will be used. In this case, a user name and password are not needed.
In the Database box, type a database name, in which data will be stored. When initially setting up the Flow Collector, a database should be created. To do this, click on the Create button, which is located in the same line as the Database box. If creation of the database is successful, a message appears: "Database 'xxxxxxxx' was created successfully", where xxxxxxxx is a database name.
In the Table box, type a table name that will be created in the database. In this table the data will be stored. Click on the Create button, which is located in the same line as the Table box. A window appears as shown below.
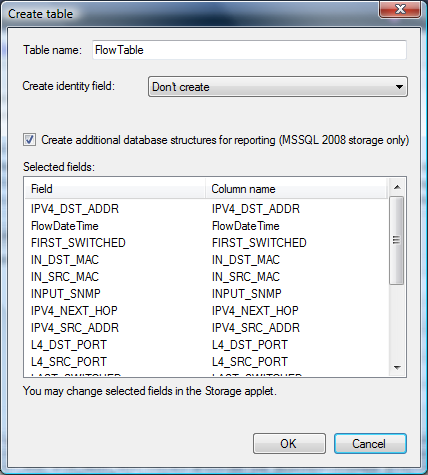
The Table name box displays the name of the table which should be created.
The Selected fields table contains fields that a user has selected in the Storage configuration page.
The Create identity field check box is used to set up a key field in the table. This key field can be used to select data on this field. There are the following options:
- Don't create. This option is used by default when you do not want to select the data using a key field. The absence of a key field allows you to several reduce the size of databases.
- binint. The bigint data type is recommended to specify for a key field, if you need in the key field and network has a relatively low traffic.
- GUID. The globally unique 128-bit identifier. It is recommended to use if you need in a key field and when network has high-traffic.
The Create additional database structure for reporting (MSSQL 2008 storage only) check box is used when you use Microsoft SQL Server 2008 R2 or higher and desire to have information about type of IP protocols and IP ports in the reports.
After choice of the required parameters, click on the OK button. Upon successful completion of the operation, a message appears: "Table 'xxxxxxxx' was successfully created", where xxxxxxx - the name of the table.
To verify parameters of Microsoft SQL Server, click on the Test Connection button. In the case of a successful connection with the SQL server a message appears: "Connection tested". In case of failure to connect you should validate the entered parameters.
In case you have selected the MySQL option in the Storage type list, the Port list appears near the Server box. Select the required value of IP port from this list box. By default is used: 3306.
In case you selected the CSV file option in the Storage type list, the program window partially changes a form, as shown in the figure below.
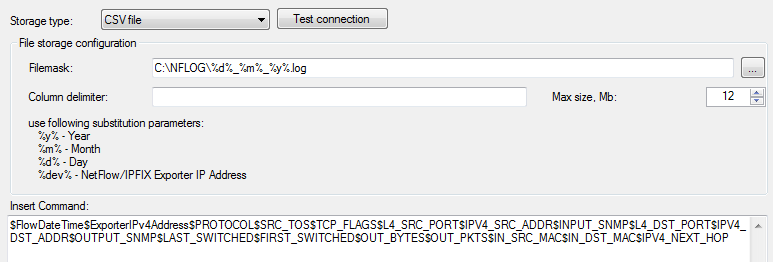
The Filemask box is used to configure a path to the file and a file name mask. To set a mask the following options are used:
- %y% - year;
- %m% - month;
- %d% - day;
- %dev% - IP address of device from which data are collected.
By default this file has the extension: log.
User can specify a delimiter in the Column delimiter box.
In the Max size box, type or select the required file size. Upon reaching the typed value of size, a new file is automatically created.
After set up all required parameters in the Storage configuration page, click Save on the toolbar.
Configuration of aggregation parameters
If you plan to aggregate data on some of the field, you must configure the aggregation parameters. Using aggregation allows to significantly reduce the database size, but at the expense of losing the details. To set up the aggregation parameters, select the Aggregation configuration page. The program window appears as shown in figure below.

The user can set an aggregation of any of the fields specified in the table. The table contains the columns:
- #. This column is used to select the required field.
- Name. Displays a field name.
- Version. Displays a protocol type and version.
- Description. Displays a brief description of field.
- Data type. Displays a data type of field.
By default, an aggregation was set on the multiple fields. This means that the collected data will be aggregated on these fields for a period specified in the Buffer flush interval box.
By default, the value of this parameter is 3000 ms. User can change this value. It should be borne in mind that a reduction of the value leads to growth of the load on the CPU. Increasing the interval reduces the load on the processor, but the user during this interval may not have access to the data obtained during this period and, therefore, to analyze them.
If you specify multiple fields for aggregation, the aggregation will be performed for a set of specified fields.
To work with data tables (sorting, grouping, searching) apply the same methods described for the table of the Storage configuration page.
Installation and start of the SoftPI Flow Collector service
To install and start the service, select the Service configuration page. The program window for this page is shown in figure below.
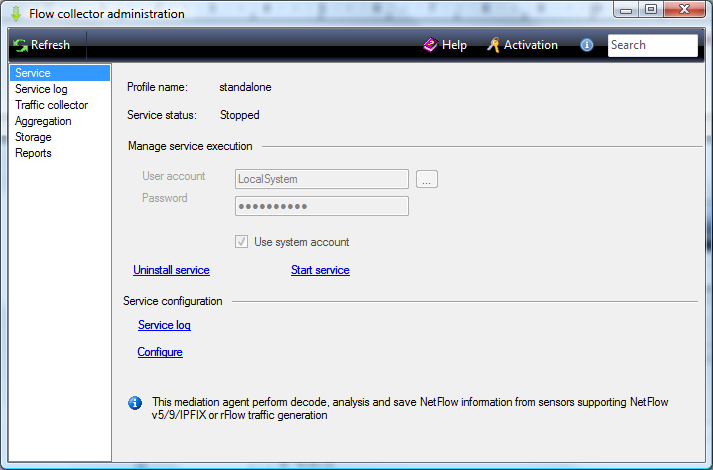
The Service status parameter displays a current service status.
Click on the Start service link to start the service. If start is successful, the link will be replaced with Stop Service and the Uninstall service link will become inactive.
Click on the Stop service link to stop the service. After stopping the service the link changes its value at Start Service and the Uninstall service link will become active.
To keep track of the details of the SoftPI Flow Collector, click on the Service log link or select this feature in the list of program applets.
Click on the Configure link to move on the Traffic collector configuration page.